



Today we’re going to look at how to automate your shopping list so you can update it easily and include some automations.
Índice
Prerequisites
Before automating your shopping list, make sure you meet the following requirements:
- Install via HACS the following custom cards: Bubble Card, Mushroom Cards, Card Mod, and Auto Entities.
- Create the file ‘command_line.yaml’ inside the ‘config’ folder, and add it to the configuration by including the following lines in your ‘configuration.yaml’ file:
command_line: !include command_line.yaml
- Import and configure the blueprint I’ve prepared by clicking the following button (more details in the corresponding section).

Shopping List Integration
To automate your shopping list, we will use Home Assistant’s official integration, which makes the process very simple. Just follow these steps:
- First, if you were using another unofficial integration (such as Bring!), remove it via Settings > Devices & Services. Also, make sure to delete the ‘shopping_list’ folder located in ‘config/custom_components’, and restart Home Assistant.
- Go to Settings > Devices & Services > Add Integration, search for “Shopping List”, and click “Submit.”
- You’ll now have a new option called “Shopping List” under the “To-do list” section in the left-hand menu, where you can manage it manually.
- A new entity has also been created (for example, todo.shopping_list). You can check it from Developer Tools > States.
Creating Sensors
Creating Shopping List Sensors
Next step is to create some sensors that allow us to extract the items from the shopping list. This will be useful for building the lovelace cards and creating automations.
We’re going to include these sensors inside the ‘command_line.yaml’ file by copying the following code:
- sensor:
    name: "Shopping list (items to buy)"
    command: >
        jq '{list: ([.[] | select(.complete==false) | .name] | join(","))}' .shopping_list.json
    value_template: >
        {% if value_json.list == "" %}0
        {% else %}{{ value_json.list.split(',') | length }}
        {% endif %}
    json_attributes:
        - list
    scan_interval: 1

- sensor:
    name: "Shopping list (bought items)"
    command: >
        jq '{list: ([.[] | select(.complete==true) | .name] | join(","))}' .shopping_list.json
    value_template: >
        {% if value_json.list == "" %}0
        {% else %}{{ value_json.list.split(',') | length }}
        {% endif %}
    json_attributes:
        - list
    scan_interval: 1
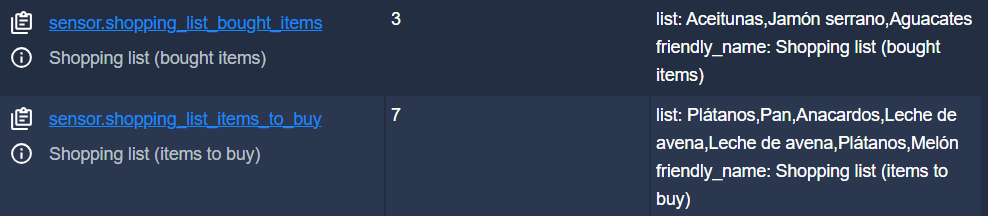
This will create the following entities:
- The entity ‘sensor.shopping_list_items_to_buy’ has as its value the number of items currently on the shopping list, and the full list is available in its list attribute.
- The entity ‘sensor.shopping_list_bought_items’ has as its value the number of items recently purchased, and the list is also available in its list attribute.
Creating Product Sensors
Any product you add will appear on your shopping list. However, you can also create as many custom sensors for individual products as you like. This allows you to assign attributes to your products (such as an image, category, price, stock, etc.), adding more functionality to your shopping list.
To do this, include the following snippet in your ‘sensors.yaml’ file, replicate and customize it for each of your products.
- platform: template
  sensors:
    shopping_list_avocados:
      friendly_name: "Avocados"
      value_template: >
        {% set product = "Avocados" %}
        {% set products = (state_attr('sensor.shopping_list_items_to_buy','list') or '').split(',') %}
        {%- set items = products | select('equalto', product) | list | length | string -%}
        {{ items | int }}
      entity_picture_template: "https://cdn-icons-png.flaticon.com/256/2771/2771201.png"
      attribute_templates:
        category: "Fruits"
        store: "Carrefour"
        total_cost: >
          {{ (2.54 | float) * (states('sensor.shopping_list_avocados') | float) }}
        units: "Avocados"
        featured: "Favorites"

- platform: template
  sensors:
    shopping_list_watermelon:
      friendly_name: "Watermelon"
      value_template: >
        {% set product = "Watermelon" %}
        {% set products = (state_attr('sensor.shopping_list_items_to_buy','list') or '').split(',') %}
        {%- set items = products | select('equalto', product) | list | length | string -%}
        {{ items | int }}
      entity_picture_template: "https://cdn-icons-png.flaticon.com/256/883/883518.png"
      attribute_templates:
        category: "Fruits"
        store: "Carrefour"
        total_cost: >
          {{ (7.75 | float) * (states('sensor.shopping_list_watermelon') | float) }}
        units: "Watermelon"
        featured: >
          {% if 10 > now().month > 4 %}Seasonal
          {% else %}false
          {% endif %}
Review the code above and note the following:
- The name of the sensor must always be lowercase, without spaces or special characters, and it must begin with the prefix ‘shopping_list_’. This is important to ensure the corresponding sensor is created and displayed correctly in our list.
- The value of the sensor represents the quantity of the product you’ve added to the shopping list (e.g., 3 avocados, 2 bottles of milk, etc.).
- You can assign any image you like to be displayed in the list and catalog. Just provide the image URL—you don’t need to download it (though I recommend using low-resolution icons to avoid slowing down the load time).
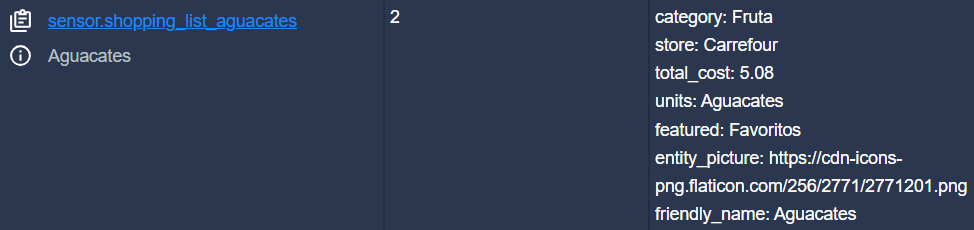
- You can also assign as many custom attributes as you like, to be used later in the list. For example, I’ve created the following:
- Category. The product’s category (e.g., «fruit», «meat», etc.) is used to automatically classify items in the catalog.
- Store. The store where I usually buy the product (e.g., «Carrefour», «LIDL», etc.). This allows me to filter the list depending on which store I’m in, making shopping faster.
- Total cost. It calculates the estimated cost of the product purchase, taking into account the quantity. You can either enter the price manually or scrape it from your supermarket’s website to keep it updated. This helps estimate the total cost of all the products on the shopping list.
- Units. An informative label that indicates the unit of purchase (e.g., «grams», «boxes», «bottles», etc.), which I display in the list.
- Featured. In this attribute, I include custom rules to suggest products i may want. For example, if I want to include seasonal items, I check the current month (returning “Seasonal” if true, or “false” otherwise). Other examples might include evaluating your physical condition, or prices to suggest discounted items.
For each sensor, an entity of the following type will be created (for example, sensor.shopping_list_aguacate).
Creating Custom Sensors
This part depends on your imagination and the attributes you’ve decided to assign to your products. As an example, I found it interesting to reflect the estimated cost of each product (based on the number of units added to the list).
By assigning that attribute to the products, I can now create a custom sensor that sums the cost of all items in the basket, giving me an estimated cost for the next shopping trip. From there, I can display it on the shopping list card, use it in automations to notify me when the total exceeds a certain amount, or even accumulate it in a helper to track how much I spend each month.
The code to create this sensor would look like this:
- platform: template
  sensors:
    next_shopping_trip_cost:
      friendly_name: "Next shopping trip cost"
      value_template: >
        {% set coste = states
          | selectattr('entity_id', 'contains', 'shopping_list')
          | rejectattr('entity_id', 'contains', 'shopping_list_items_to_buy')
          | rejectattr('entity_id', 'contains', 'sensor.shopping_list_bought_items')
          | rejectattr('entity_id', 'contains', 'sensor.shopping_list_budget')
          | selectattr('domain', 'equalto', 'sensor')
          | selectattr('state', 'gt', '0')
          | selectattr('attributes.total_cost', 'defined')
          | map(attribute='attributes.total_cost')
          | list
          | sum
        %}{{ coste | round(0) }}€
As I was saying, this is where everyone’s individual priorities come into play. For example, I’m sure many of you might be interested in tracking products with low stock, recording expiration dates, calorie counts, or even the Nutri-Score of each food item.
As always, we’re looking forward to seeing you share your ideas in our community!
Creating the Lovelace Panel
With the sensors we’ve just created, we can now transform the interface to control and automate your shopping list.
Shopping List Card
This is the main card, which displays the items on the shopping list.
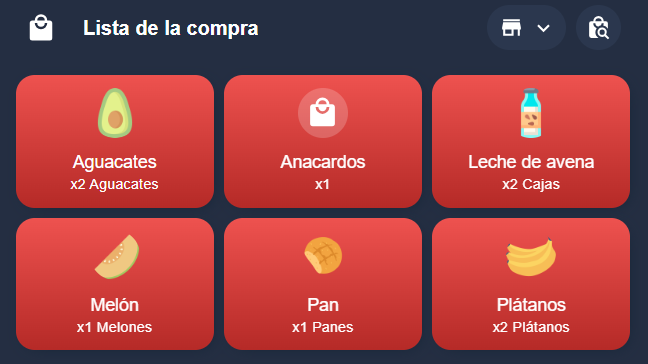
As you can see, it has the following features:
- In the upper right corner, you’ll find a dropdown menu that allows you to filter the list by the store assigned to the products. The idea is to make shopping easier depending on where you are. For this to work, you need to create a dropdown helper called ‘input_select.shopping_list_stores’ and include the stores you want to filter by (for example, «Carrefour», «LIDL», etc.). The store names must match those assigned in the store attribute of the product sensors.
- To its right, there’s a shortcut to the catalog for adding products, which we’ll cover next.
- Below, there’s a block for each product on the shopping list. If you click on a block, one unit of that product will be removed from the shopping list. As you can see, the number of units you want to buy is also shown. Additionally, products will be added to your list even if you haven’t included them in your catalog.
If you’ve already created your catalog, all you have to do is copy the following code and it will be created automatically.
type: vertical-stack
cards:
  - type: custom:bubble-card
    card_type: separator
    name: Shopping List
    icon: mdi:shopping
    sub_button:
      - name: Tienda
        show_name: false
        show_icon: true
        icon: ""
        entity: input_select.shopping_list_stores
      - show_name: false
        show_icon: true
        icon: mdi:shopping-search
        tap_action:
          action: navigate
          navigation_path: "#shopping_list"
    modules:
      - default
    card_mod:
      style: |
        ha-card {
          margin-top: 10px!important;
          margin-bottom: 10px!important;
        }
  - type: custom:auto-entities
    visibility:
      - condition: state
        entity: sensor.shopping_list_items_to_buy
        state_not: "0"
    show_empty: false
    card:
      square: false
      type: grid
      columns: 3
    card_param: cards
    filter:
      template: >-
        {% set productos =
        (state_attr('sensor.shopping_list_items_to_buy','list') or
        '').split(',') %} {% set unicos = productos | unique | list | sort %}

        {% for producto in unicos -%}
          {%- set slug = producto | slugify -%}
          {%- set entity = 'sensor.shopping_list_' + slug -%}
          {%- set cantidad = productos | select('equalto', producto) | list | length | string -%}
          {%- set unidades = state_attr(entity,'units') -%}
          {%- set store = state_attr(entity,'store') -%}
          {%- if states(entity) != 'unknown' -%}
            {%- set name = state_attr(entity,'friendly_name') or producto -%}
            {%- set picture = state_attr(entity,'entity_picture') -%}

            {%- if states('input_select.shopping_list_stores') != 'Todas' and states('input_select.shopping_list_stores') == store -%}

            {{
              {
                'type': 'custom:mushroom-template-card',
                'entity': 'sensor.items_in_shopping_list_number',
                'primary': name,
                'secondary': 'x' + cantidad + ' ' + unidades,
                'layout': 'vertical',
                'multiline_secondary': 'true',
                'picture': picture,
                'fill_container': 'true',
                'tap_action': {
                  'action': 'call-service',
                  'service': 'shopping_list.complete_item',
                  'data': { 'name': name }
                },
                'card_mod': {
                  'style': 'ha-card { background: linear-gradient( rgba(238, 82, 79, 1), rgba(181, 42, 39, 1) ); border-radius: 15px; --icon-size: 40px; --card-secondary-font-size: 11px; --secondary-text-color: #ffffff; };',
                },
              }
            }},
            {%- elif states('input_select.shopping_list_stores') == 'Todas' -%}

            {{
              {
                'type': 'custom:mushroom-template-card',
                'entity': 'sensor.items_in_shopping_list_number',
                'primary': name,
                'secondary': 'x' + cantidad + ' ' + unidades,
                'layout': 'vertical',
                'multiline_secondary': 'true',
                'picture': picture,
                'fill_container': 'true',
                'tap_action': {
                  'action': 'call-service',
                  'service': 'shopping_list.complete_item',
                  'data': { 'name': name }
                },
                'card_mod': {
                  'style': 'ha-card { background: linear-gradient( rgba(238, 82, 79, 1), rgba(181, 42, 39, 1) ); border-radius: 15px; --icon-size: 40px; --card-secondary-font-size: 11px; --secondary-text-color: #ffffff; };',
                },
              }
            }},
            {%- endif -%}
          {%- else -%}
            {%- set name = producto | capitalize -%}
            {{
              {
                'type': 'custom:mushroom-template-card',
                'primary': name,
                'secondary': 'x' + cantidad,
                'multiline_secondary': 'true',
                'icon': 'mdi:shopping',
                'icon_color': 'white',
                'layout': 'vertical',
                'fill_container': 'true',
                'tap_action': {
                  'action': 'call-service',
                  'service': 'shopping_list.complete_item',
                  'data': { 'name': name }
                },
                'card_mod': {
                  'style': 'ha-card { min-height: 106px!important; background: linear-gradient( rgba(238, 82, 79, 1), rgba(181, 42, 39, 1) ); border-radius: 15px; --icon-size: 40px; --card-secondary-font-size: 11px; --secondary-text-color: #ffffff; };',
                },
              }
            }},
          {%- endif -%}
        {%- endfor %}
Lovelace Card for Adding Products
This card is used to add products to the list in various ways. In my case, I open this card in a Bubble Card popup, accessed via the shortcut I mentioned in the previous section (though you can place it wherever you want).
- Text field. At the top of the card, there is always a text field that allows you to add products to the shopping list simply by typing them in. It doesn’t matter whether they are already included in your catalog or not.

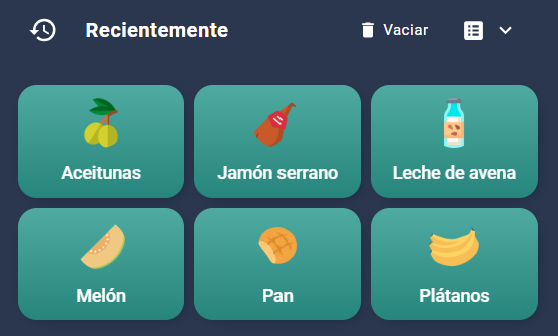
- Recently purchased products. In this section, you’ll find the products you’ve recently bought. If you click on any of them, they will be added back to the shopping list, making it the quickest way to update it. You can also clear this section by clicking the “Clear” icon at the top.
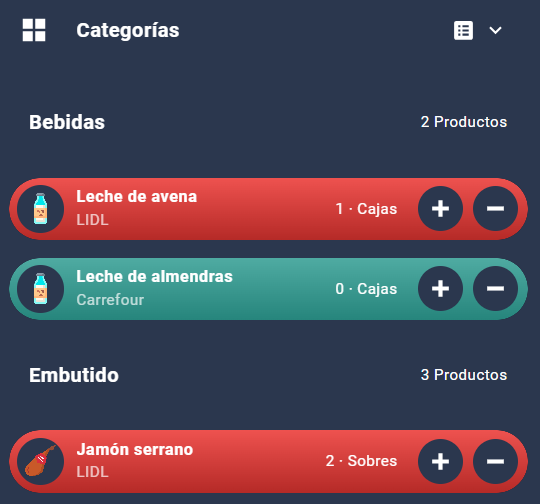
- Products Sorted by Category. In this section, you can find the products you’ve added to your catalog, sorted alphabetically and by category (matching what you specified in your custom sensors). Additionally, you’ll see if a product is already on the list (highlighted in red) or not, and you can adjust the quantities using the corresponding icons. This is the best way to make your shopping list more complete.
- Suggested products. This section works like the previous one, but instead of sorting products by category, it sorts them by type of suggestion (as long as it’s different from ‘false’). Perfect if you want to be guided when selecting your products.
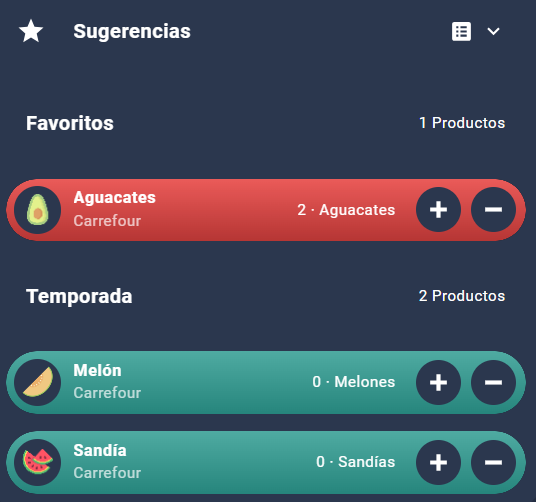
- Additionally, in the upper right corner, you’ll find a dropdown menu that lets you jump from one section to another (as we learned with our dynamic menus). For it to work, you just need to create another dropdown helper called ‘input_select.shopping_list_filter’ and add the options: «Categories», «Recent», and «Suggestions».
If you’ve already created your catalog, all you have to do is copy the following code and it will be created automatically.
type: vertical-stack
cards:
- type: custom:bubble-card
card_type: pop-up
hash: "#shopping_list"
icon: mdi:shopping-search
name: Catalog
button_type: name
modules:
- default
- type: todo-list
entity: todo.lista_de_la_compra
hide_completed: true
hide_create: false
card_mod:
style: |
ha-card {
background: transparent;
border: 0px;
box-shadow: none;
margin-left: -10px;
}
ha-list {
display: none;
}
- type: vertical-stack
visibility:
- condition: state
entity: input_select.shopping_list_filter
state: Recent
cards:
- type: custom:bubble-card
card_type: separator
name: Recently
icon: mdi:history
sub_button:
- name: Clear
show_name: true
icon: mdi:delete
tap_action:
action: perform-action
perform_action: shopping_list.clear_completed_items
target: {}
- entity: input_select.shopping_list_filter
name: ""
show_name: false
show_icon: true
modules:
- default
card_mod:
style: |
ha-card {
margin-top: 10px!important;
margin-bottom: 10px!important;
}
- type: custom:auto-entities
visibility:
- condition: numeric_state
entity: sensor.shopping_list_bought_items
above: 0
show_empty: false
card:
square: false
type: grid
columns: 3
card_param: cards
filter:
template: >-
{% set LISTA =
state_attr('sensor.shopping_list_bought_items','list').split(',') %}
{% set LISTA_ORDENADA = LISTA | sort %} {% set ITEMS =
LISTA_ORDENADA | count %}
{% for INDEX in range(ITEMS) -%}
{%- set producto_actual = LISTA_ORDENADA[INDEX] %}
{%- set check = 'sensor.shopping_list_' + producto_actual | slugify -%}
{%- if states(check) != 'unknown' -%}
{%- set entity = 'sensor.shopping_list_'+ producto_actual | slugify -%}
{%- set product = state_attr(entity,'friendly_name') -%}
{%- set picture = state_attr(entity,'entity_picture') -%}
{%- set coste = state_attr(entity,'coste') -%}
{{
{
'type': 'custom:mushroom-template-card',
'entity': 'sensor.items_in_shopping_list_number',
'primary': product,
'layout': 'vertical',
'multiline_secondary': 'true',
'picture': picture,
'fill_container': 'true',
'tap_action': {
'action': 'call-service',
'service': 'shopping_list.incomplete_item',
'data': { 'name': product }
},
'card_mod': {
'style': 'ha-card { background: linear-gradient( rgba(79, 171, 162, 1), rgba(38, 133, 124, 1) ); border-radius: 15px; --icon-size: 40px; --card-secondary-font-size: 11px; --secondary-text-color: #ffffff; };',
},
}
}},
{%- else -%}
{%- set product = producto_actual | capitalize -%}
{{
{
'type': 'custom:mushroom-template-card',
'primary': product,
'secondary': '',
'multiline_secondary': 'true',
'icon': 'mdi:shopping',
'icon_color': 'white',
'layout': 'vertical',
'fill_container': 'true',
'tap_action': {
'action': 'call-service',
'service': 'shopping_list.incomplete_item',
'data': { 'name': product }
},
'card_mod': {
'style': 'ha-card { min-height: 106px!important; background: linear-gradient( rgba(79, 171, 162, 1), rgba(38, 133, 124, 1) ); border-radius: 15px; --icon-size: 40px; --card-secondary-font-size: 11px; --secondary-text-color: #ffffff; };',
},
}
}},
{%- endif -%}
{%- endfor %}
- type: vertical-stack
visibility:
- condition: state
entity: input_select.shopping_list_filter
state: Categories
cards:
- type: custom:bubble-card
card_type: separator
name: Categories
icon: mdi:view-grid
sub_button:
- entity: input_select.shopping_list_filter
name: ""
show_name: false
show_icon: true
modules:
- default
card_mod:
style: |
ha-card {
margin-top: 10px!important;
margin-bottom: 10px!important;
}
- type: custom:auto-entities
show_empty: false
card:
type: vertical-stack
card_param: cards
filter:
template: |-
{%- set CATEGORIES = states
|selectattr('entity_id', 'contains', 'shopping_list')
|selectattr('domain', 'equalto', 'sensor')
|rejectattr('entity_id', 'equalto', 'sensor.shopping_list_bought_items')
|rejectattr('entity_id', 'equalto', 'sensor.shopping_list_items_to_buy')
|map(attribute='attributes.category')
|unique
|list
|sort
-%}
{%- for CAT in CATEGORIES -%}
{%- set ITEMS = states
|selectattr('entity_id', 'contains', 'shopping_list')
|selectattr('attributes.category', 'equalto', CAT)
|map(attribute='entity_id')
|list
|length
-%}
{{
{
'type': 'custom:bubble-card',
'card_type': 'separator',
'name': CAT,
'card_mod': {
'style': 'ha-card {margin-top: 10px!important; margin-bottom: 10px!important;}'
},
'sub_button': [
{
'name': ITEMS|string + ' Productos',
'show_name': true,
'tap_action': {
'action': 'none',
},
},
]
}
}},
{%- set PRODUCTS = states
|selectattr('entity_id', 'contains', 'shopping_list')
|selectattr('attributes.category', 'equalto', CAT)
|map(attribute='entity_id')
|list
-%}
{%- for PRODUCT in PRODUCTS -%}
{%- set entity = PRODUCT -%}
{%- set product = state_attr(entity,'friendly_name') -%}
{{
{
'type': 'custom:bubble-card',
'card_type': 'button',
'button_type': 'state',
'entity': entity,
'show_state': False,
'show_attribute': True,
'attribute': 'store',
'show_last_changed': False,
'tap_action': {
'action': 'perform-action',
'perform_action': 'shopping_list.add_item',
'data': { 'name': product }
},
'button_action': {
'tap_action': {
'action': 'perform-action',
'perform_action': 'shopping_list.add_item',
'data': { 'name': product }
},
},
'card_mod': {
'style': (
'.bubble-button-background { opacity: 1 !important; background: linear-gradient('
+ (
'rgba(238, 82, 79, 1), rgba(181, 42, 39, 1)' if product in (state_attr('sensor.shopping_list_items_to_buy','list')) else
'rgba(79, 171, 162, 1), rgba(38, 133, 124, 1)'
)
+ '); } .bubble-entity-picture { width: 25px !important; height: 25px !important; margin-top: 6px;}'
)
},
'sub_button': [
{
'entity': entity,
'show_state': True,
'attribute': 'units',
'show_background': False,
'show_attribute': True,
'show_icon': False,
},
{
'attribute': 'tienda',
'icon': 'mdi:plus-thick',
'show_background': True,
'state_background': False,
'tap_action': {
'action': 'perform-action',
'perform_action': 'shopping_list.add_item',
'data': { 'name': product }
},
},
{
'attribute': 'tienda',
'icon': 'mdi:minus-thick',
'show_background': True,
'state_background': False,
'tap_action': {
'action': 'perform-action',
'perform_action': 'shopping_list.complete_item',
'data': { 'name': product }
},
},
]
}
}},
{%- endfor %}
{%- endfor %}
- type: vertical-stack
visibility:
- condition: state
entity: input_select.shopping_list_filter
state: Suggestions
cards:
- type: custom:bubble-card
card_type: separator
name: Suggestions
icon: mdi:star
sub_button:
- entity: input_select.shopping_list_filter
name: ""
show_name: false
show_icon: true
modules:
- default
card_mod:
style: |
ha-card {
margin-top: 10px!important;
margin-bottom: 10px!important;
}
- type: custom:auto-entities
show_empty: false
card:
type: vertical-stack
card_param: cards
filter:
template: |-
{%- set SUGGESTIONS = states
|selectattr('entity_id', 'contains', 'shopping_list')
|selectattr('domain', 'equalto', 'sensor')
|rejectattr('entity_id', 'equalto', 'sensor.shopping_list_bought_items')
|rejectattr('entity_id', 'equalto', 'sensor.shopping_list_items_to_buy')
|rejectattr('attributes.featured', 'equalto', 'false')
|map(attribute='attributes.featured')
|unique
|list
|sort
-%}
{%- for SUG in SUGGESTIONS -%}
{%- set ITEMS = states
|selectattr('entity_id', 'contains', 'shopping_list')
|selectattr('attributes.featured', 'equalto', SUG)
|map(attribute='entity_id')
|list
|length
-%}
{{
{
'type': 'custom:bubble-card',
'card_type': 'separator',
'name': SUG,
'card_mod': {
'style': 'ha-card {margin-top: 10px!important; margin-bottom: 10px!important;}'
},
'sub_button': [
{
'name': ITEMS|string + ' Productos',
'show_name': true,
},
]
}
}},
{%- set PRODUCTS = states
|selectattr('entity_id', 'contains', 'shopping_list')
|selectattr('attributes.featured', 'equalto', SUG)
|map(attribute='entity_id')
|list
-%}
{%- for PRODUCT in PRODUCTS -%}
{%- set entity = PRODUCT -%}
{%- set product = state_attr(entity,'friendly_name') -%}
{{
{
'type': 'custom:bubble-card',
'card_type': 'button',
'button_type': 'state',
'entity': entity,
'show_state': False,
'show_attribute': True,
'attribute': 'store',
'show_last_changed': False,
'tap_action': {
'action': 'perform-action',
'perform_action': 'shopping_list.add_item',
'data': { 'name': product }
},
'button_action': {
'tap_action': {
'action': 'perform-action',
'perform_action': 'shopping_list.add_item',
'data': { 'name': product }
},
},
'card_mod': {
'style': (
'.bubble-button-background { opacity: 1 !important; background: linear-gradient('
+ (
'rgba(238, 82, 79, 1), rgba(181, 42, 39, 1)' if product in (state_attr('sensor.shopping_list_items_to_buy','list')) else
'rgba(79, 171, 162, 1), rgba(38, 133, 124, 1)'
)
+ '); } .bubble-entity-picture { width: 25px !important; height: 25px !important; margin-top: 6px;}'
)
},
'sub_button': [
{
'entity': entity,
'show_state': True,
'attribute': 'units',
'show_background': False,
'show_attribute': True,
'show_icon': False,
},
{
'attribute': 'tienda',
'icon': 'mdi:plus-thick',
'show_background': True,
'state_background': False,
'tap_action': {
'action': 'perform-action',
'perform_action': 'shopping_list.add_item',
'data': { 'name': product }
},
},
{
'attribute': 'tienda',
'icon': 'mdi:minus-thick',
'show_background': True,
'state_background': False,
'tap_action': {
'action': 'perform-action',
'perform_action': 'shopping_list.complete_item',
'data': { 'name': product }
},
},
]
}
}},
{%- endfor %}
{%- endfor %}
Blueprint import
Click the button below to import and configure the blueprint I’ve created. Basically, all you need to do is select the sensor that contains the shopping list. If you’ve followed the instructions, the entity should be named ‘sensor.shopping_list_items_to_buy’.
This blueprint handles a few checks to ensure everything works correctly. Optionally, you can also configure a notification so that Home Assistant alerts you when the shopping list exceeds ‘x’ items.
Syncing with Other Lists
One of the advantages of automating your shopping list is that it allows you to sync it with other lists compatible with Home Assistant.
Syncing the List with Bring! and Siri
Until I decided to automate my shopping list with Home Assistant, Bring! had been my go-to app for years, as I find it a very attractive application that meets all the requirements.
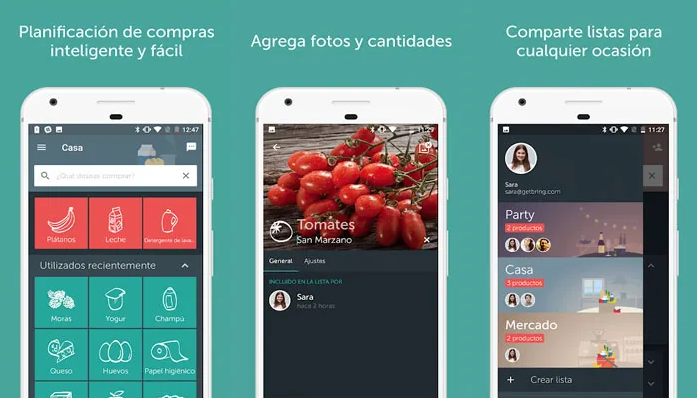
This is the perfect complement, as it lets us enjoy the best of both worlds. From Home Assistant, we can continue creating automations around our shopping list, while relying on Bring! for household members who don’t have access to Home Assistant — all while keeping both lists in sync.


If you’re using our shopping list, to sync them you just need to integrate Bring! into Home Assistant and import the blueprint I’ve created by clicking the button below.
Additionally, if you’re an Apple user, you can add items simply by saying, «Hey Siri, add avocados to Bring shopping list«. The best part is that you only need to install the app on your iOS device—nothing else. No configuration required.
When you ask Siri to add a product to your list, it will automatically appear in both your Bring! app and your Home Assistant shopping list.
Syncing the List with Google Assistant
One of the best things about Google Assistant is that it’s natively integrated into any Android device, making it very easy to access. It’s a great option for adding items to the list from the kitchen tablet when my hands are full!
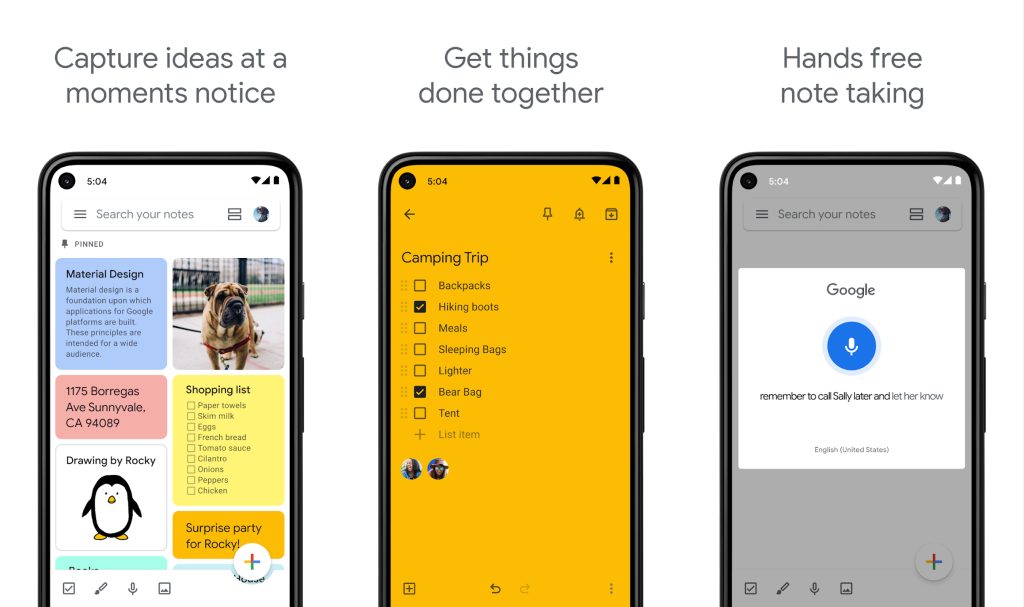


When you ask Google Assistant to add a product to your shopping list, it will add it to a Google Keep list (Google’s app for notes and lists). So, all you need to do is integrate Google Keep with Home Assistant and import the blueprint I’ve created by clicking the button below.
Local Control of the Shopping List
If you prefer not to use third-party services or apps, you can also automate your shopping list and control it directly from your devices.
Manage the List with Assist
We’ve already talked extensively about Assist, Home Assistant’s local assistant (both its setup and the many devices that let you control it). Of course, you can ask it to add products to your shopping list (either by typing or using your voice) and it will do so without any issues.
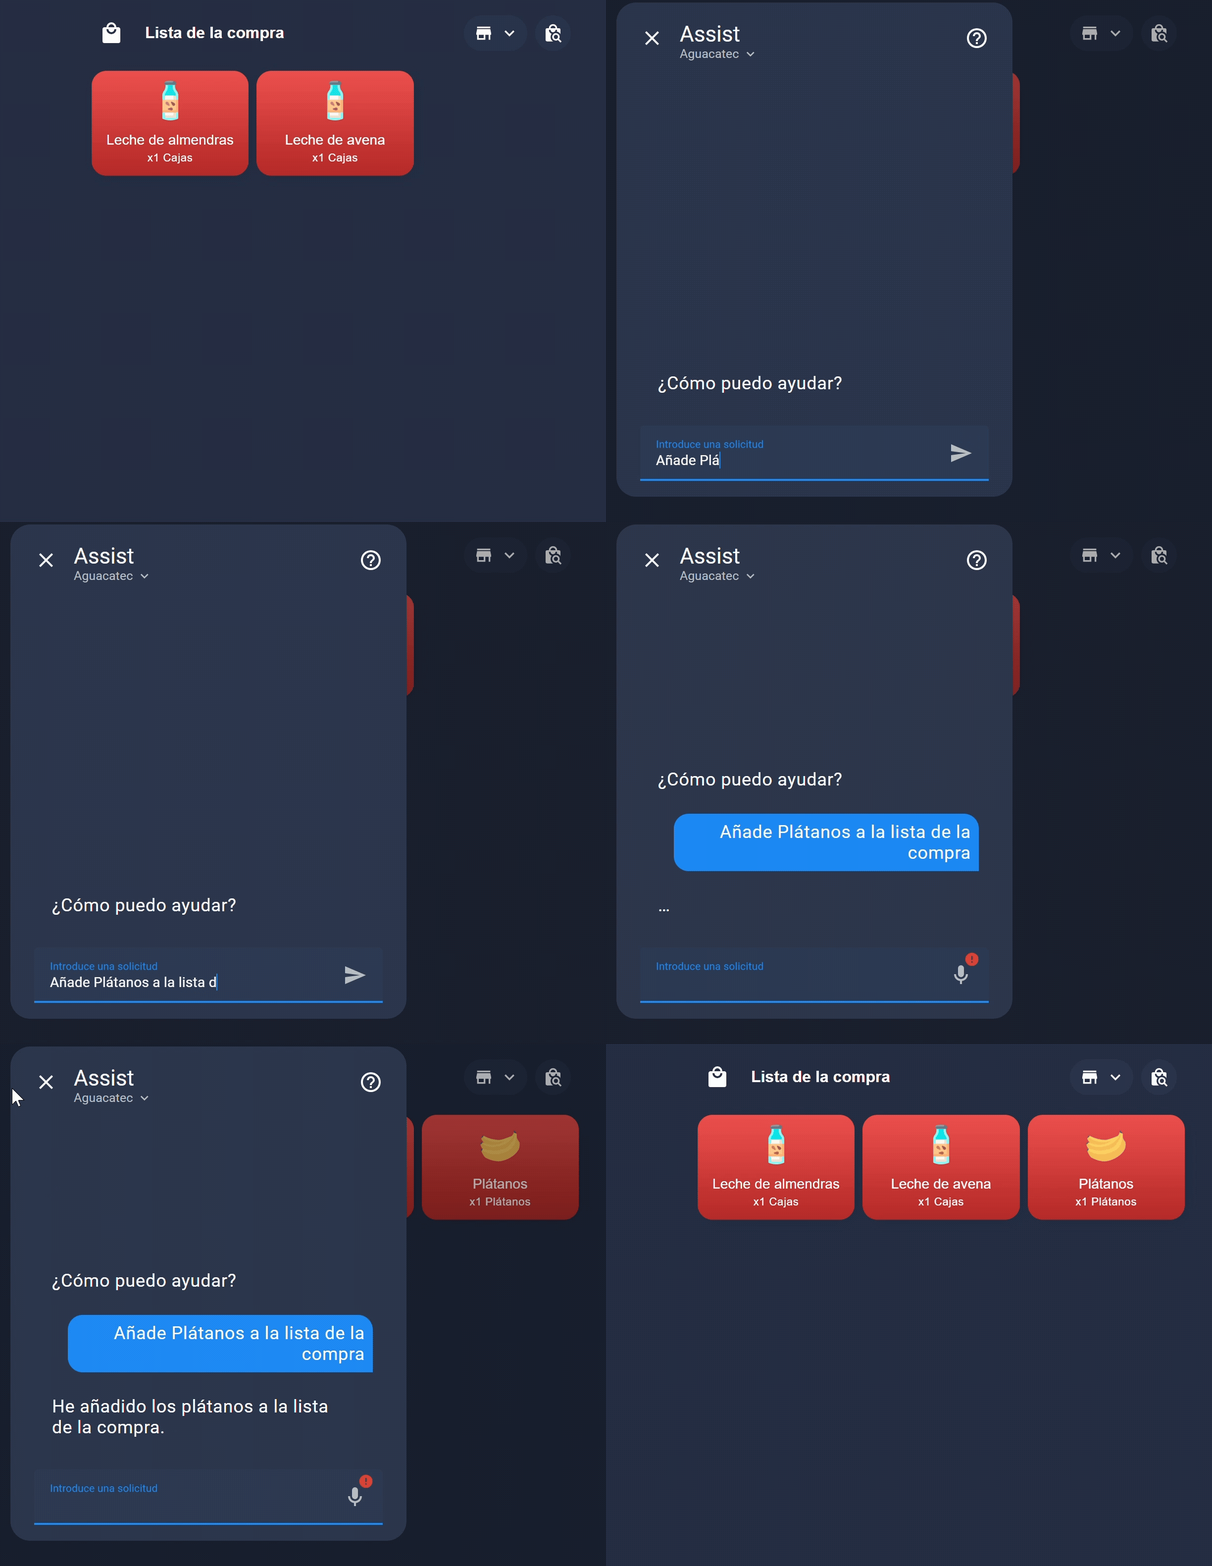
Manage the List with Your Amazfit Watch
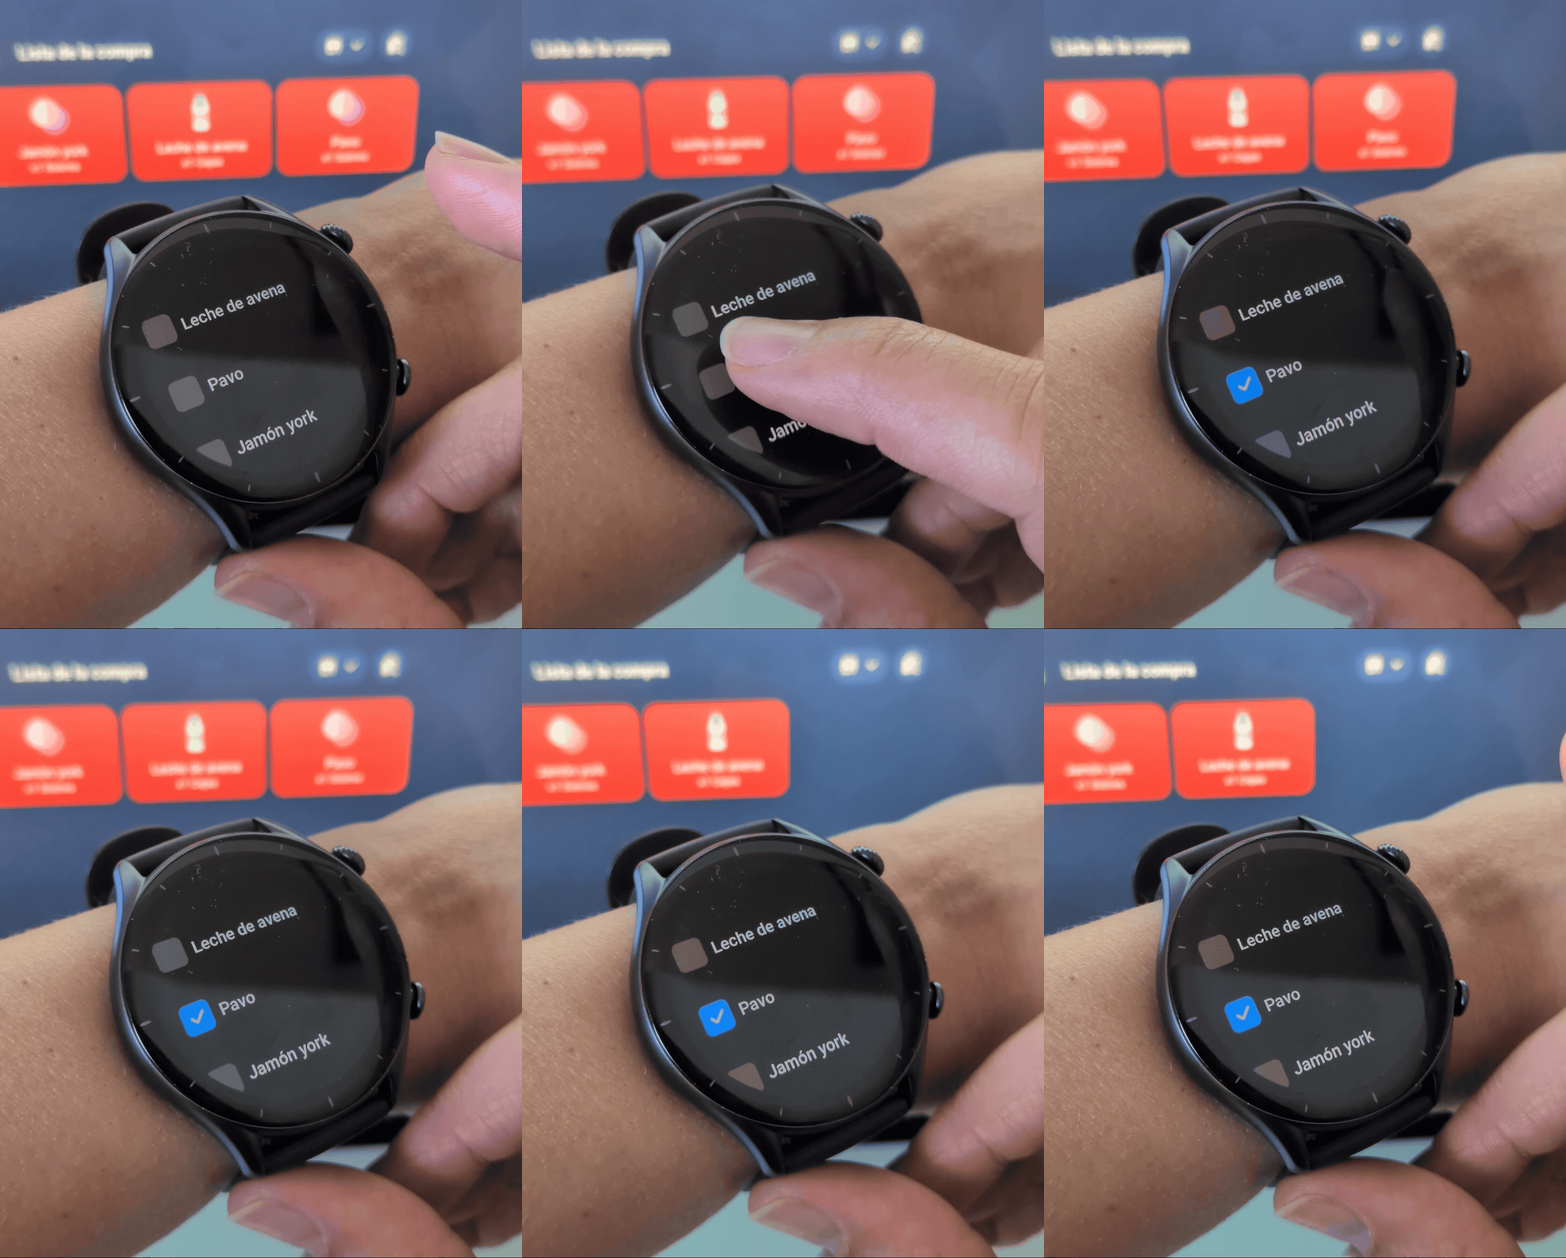
One of my favorite ways to manage the shopping list is through our app for Amazfit watches. When I’m at the supermarket, I simply open the app on my smartwatch and check off the items I’ve picked up. Fast and easy!
To do this, once you’ve configured the app, all you need to do is select the shopping list entity (for example, ‘todo.lista_de_la_compra’) in the app’s settings. It will automatically appear on your watch!
More ideas to automate your shopping list
Over the time we’ve been experimenting with the shopping list, we’ve shared plenty of ideas for creating automations, such as:
- Automatically add products based on information from integrated devices (for example, add “Detergent” every 50 washing machine cycles) or based on the maturation period of products you consume regularly (for example, add cold cuts once a week).
- Add products by scanning NFC tags strategically placed around your home to make the process easier (for example, on pantry boxes).
- Add all the products from a recipe by running a script composed of a sequence of actions that adds each ingredient (and if you want, create a recipe book in Home Assistant).
- Schedule notifications when a household member is at the supermarket, to add last-minute products to the list.